

Can I Upload A Large Image To Facebook
Resizing images for the spider web – Website paradigm size guidelines 2021
- View Larger Image

Website image size guidelines 2021 – Updated: 04 February, 2021
The topic of resizing images for the web is a relatively simple, yet ridiculously circuitous one, at the same time. And it'due south also i where at that place is an atrocious lot of misinformation floating around, even from professionals. Only a lot of people have a demand for basic foundational skills when it comes to understanding and resizing digital images for diverse purposes. Hence this mail service…
Huge caveat here: My primary field of cognition is in photography. I have been fiddling with cameras my whole life, and have taught photography and digital imaging at local colleges and independently for the last 10 years (visit iTeachphotographers for more on that), and I experience like I have a reasonably authoritative voice on the topic. I also design, host and maintain WordPress websites. While I can read and write HMTL and CSS, I am more a designer than a coder, and I don't profess to be know everything about the technical intricacies of spider web design. And I certainly don't profess to knowing everything at that place is to know about pixels either, particularly about pre-press and the printing manufacture. Then if, in spite of my feel and research, I am misinformed or mistaken near some bespeak or other, I welcome any corrections.
Simply Pixels Thing
This is a great starting indicate. Digital imaging capture devices (aka cameras, but also scanners) have a fixed number of pixels they can capture in ane image. A Canon EOS 5D MkIII for example can capture an image at 5,760 10 3,840 pixels. If we multiply those together nosotros get 22,118,400 pixels, which reflects that it is a 22 Megapixel camera (22 million pixels).
A Nikon D800 captures a whopping 7,360 × iv,912pixels (a 36.3MP camera). The top of the line Phase One Digital Camera back, the IQ180, captures a staggering 10328 ten 7760 pixels (over 80 million pixels!). So, pixels are finite and are linked to the capture device. Pixels are our starting bespeak. They are the raw fabric of our images, whether we are are printing or but displaying the prototype on a screen.
The other main role player in the story is resolution. Resolution has many different meanings, and is quite complex when yous wait into it. Broadly speaking though, resolution is basically referring to the particular an image has. The higher the resolution, the more item there is. But in this article, the main type of resolution concept I want to introduce is chosen pixels per inch, otherwise known equally ppi. The all-time way to think about how resolution works together with the number of pixels captured in an image, is that "the number of pixels is determined by the capture device, but pixels have no stock-still size". A pixel is a unit of a digital prototype, but overall resolution depends upon the size of the pixels (and the viewing altitude). The smaller the size of a pixel, the higher the resolution of the image will be and the clearer the image will be.
PPI vs DPI
Earlier we get any further, I retrieve it'south important to analyze the oft misused terms dpi and ppi. DPI is a press term, and it stands for DOTS PER INCH. Printers lay their ink downwardly in dots, and this figure is not the same every bit PPI. Dots accept space in betwixt them, and pixels don't. DPI doesn't accept whatever real relevance to our discussion today.
PPI on the other paw, which stands for PIXELS PER INCH, is a term that relates to digital images. Pixels, or picture elements, as we have established, are what digital images are made upwards of, and are square. The terms DPI and PPI are NOT interchangeable, and PPI is the correct term to utilize when talking about digital images. I'm not going farther into the whole DPI / PPI thing here, but there are some expert articles going into much detail on this field of study hither, here and here.
How Pixels and PPI hang together
So before we expect at images for the screen, information technology will be instructive to look quickly at Photoshop'south Image Size Dialog, to see how the resolution (ppi) of an image interacts with the pixel dimensions when printing an image.
As you tin can see here in the Photoshop Image Size dialog, Figure 1.1, digital paradigm information is presented. The Dimensions section shows the aforementioned pixel dimensions of the prototype, in this case 3840 x 5760. This dialog can be used in many ways, just what I want yous to take annotation of is the concrete dimensions listed (12.8″ x nineteen.2″). This shows usa the physical size of the image if it were to exist printed, past taking the number of pixels, and dividing it past the number of pixels per inch. In this instance, we have 5760 pixels on the longest length, and if we divide that by 300 (the PPI) nosotros get an paradigm of 19.2 inches.
What this shows u.s.a. is that print size is simply a result of how tightly nosotros squash together the pixels we have. If nosotros increase the ppi, say to 400, without resampling the image (adding to or removing from the full number of pixels), the document size goes downwardly to 14.four inches. If we spread the pixels farther and reduce the ppi to say 240, it becomes a 24 inch certificate. This what I mean when I say pixels have no fixed size.

Effigy 1.one (click for larger view)
Resampling
To consider resampling, permit's use a simple example. If we wanted to impress an viii″ ten 12″ print from the paradigm this dialog represents, how do we go virtually resizing it correctly?
Firstly, nosotros have to understand what resampling is. In a nutshell, resampling is resizing an image by reducing or increasing its number of pixels. So, if we desire to change the size of the print but keep the resolution at 300 ppi, which is a common standard from a lot of professional photograph labs, nosotros simply blazon the new dimension into the dialog, and Photoshop will throw away or create the needed number of pixels to go the dimensions to work. Now look at Effigy ane.2 below. If, for example, we type 12 inches into the elevation field, the resultant dialog would await similar this. Note how irresolute the height to 12 from 19.2 has two effects. One is that the width now becomes 8. This is simply because the aspect ratio of the prototype (2:iii) is the aforementioned attribute ratio every bit an 8×12″ print, so changing one to 12″ means the other one automatically becomes 8″. If the image did not have the aforementioned aspect ratio equally our desired 8 10 12″, then cropping would be needed instead, simply that's another story for afterward.

Figure 1.2 (click for larger view)
The 2d change we can encounter is that the pixel dimensions have changed. Photoshop has thrown the united nations-needed pixels abroad (by way of a very complex algorithm no doubt), resulting in an epitome that is now only 3600 pixels on the longest length. This gives us the correct human relationship between the document dimensions, the resolution and the number of pixels. 3600 pixels, spread out at 300 pixels per inch gives the states 12 inches of paradigm. If we were to change the resolution of the image with resample ticked, the document size would remain the aforementioned, and once more, the pixel dimensions would be altered to suit.
A final annotation here is that we tin can e'er modify the resolution of an prototype without it affecting the number of pixels in the paradigm. This is important to grasp. The resolution (ppi) is simply a press instruction. If nosotros change the resolution without changing the number of pixels in an image (by making sure Resample Prototype is unchecked), nosotros DON'T change the size of the file either. The merely two factors controlling file size are number of pixels and epitome format and compression (OK, in that location'southward arguably a tertiary factor which is the amount of detail in the photo, which affects pinch). When we uncheck the Resample Image checkbox, the pixels are greyed out in the dialog box and the only matter that tin can change when changing the ppi is the document size. And as I've said, this has no effect on file size. But information technology is useful and important to exist able fix the desired ppi when printing to dissimilar devices, and doing information technology this manner doesn't bear upon the pixels.
The 72 ppi Myth

You might take heard the proposition that information technology's of import to relieve images for web at 72 ppi (or God forbid, dpi). The reasons for this are given every bit many:
- It reduces the file size – Absolute Rubbish. PPI doesn't affect file size at all. Compression does.
- That's what resolution screens are at – You don't have to match the prototype ppi with the screen ppi. And besides, almost modern monitors are more than than 72 ppi anyway.
- It's the industry standard – This is probably the best statement of the lot, as it is a sort of manufacture standard. It's but that it'southward an industry standard for no good reason.
In fact, it is not important at all to set images to be 72 ppi for the web. Information technology doesn't hurt, only information technology's not important. The ppi of an image makes no difference to the file size and neither does information technology make any difference to the visual appearance of an paradigm on a monitor. It would of form accept an effect on how big an epitome was printed as information technology is a press instruction, merely when viewed in a browser, information technology is the monitor itself that determines how much space the pixels take up on the screen. Permit'southward expect at the three images beneath. The showtime has been saved at 72 ppi, the second at 300 ppi and the third at 1000 ppi. Encounter whatever deviation? No, of course you don't. They all share the aforementioned physical pixel dimensions (300 x 450 px), and that's the only thing the browser cares almost, so the logical instruction of ppi makes no deviation unless we print them. So hopefully, that'south all you need to put that one-time chestnut to bed. PPI has no effect on file size, and neither does information technology bear upon on-screen appearance.

Asher @ 72ppi, file size: xviii.3kb

Asher @ 300ppi, file size: 18.3kb

Asher @ 1000 ppi, file size: 18.3kb
The Origins of the Myth
Where the 72 ppi myth originally comes from is that screen resolution of the first Macintosh computers dorsum in the mid 80s, used to be 72 ppi (read more hither). Only information technology's not a stock-still number and present it'southward a lot more on near monitors. Some screens are around 96 ppi, some are up effectually 120 ppi, while the latest screens on tablets are achieving listen blowing resolutions of over 500 ppi (Retina swallow your heart out). To effigy out exactly what resolution your monitor has, merely measure the width of the screen area in inches (non the whole monitor) and then find out what the native resolution is. My monitor's native resolution is 1920 x 1080 (total HD) and my screen width is 18.622 inches. This gives me a screen resolution of just over 103 ppi. In other words, 103 pixels in an inch of screen real estate. Merely to exist thorough, I tested this past resizing an image to 1030px and opened it. And yeah, it measured exactly 10 inches across on my screen. This is an area of much debate, and it is generally print designers who argue about these numbers. Design is non simply screen based, and ppi and dpi accept major implications in the print earth. But my essential signal remains. For web based viewing of images, it'southward the screen resolution, in conjunction with the number of pixels, that determines how big the image is displayed on a monitor, not the inbuilt ppi instruction in the prototype. Another very interesting article discussing this topic is The Myth of DPI. It has its own inconsistencies (a pretty big 1 even in the championship, as he confuses dpi with ppi from the start) merely it is essentially a good read. Fifty-fifty perhaps more interesting and informative than the commodity itself though, are the comments. There are loads of them, many from quite educated graphic designers with a wealth of knowledge, and the discussion gets quite heated at times. If you accept a spare half an hour and the interest, you volition learn a lot past reading the various perspectives of web and impress designers, and those whose workflow does crave a bit more consistency and awareness about the ppi of images.
Resizing images for the Web
When you understand that there is no real demand for setting the ppi in images destined for the web, resizing becomes a lot simpler. Basically, you lot resize the image in pixels at the size you want it to display. Did I say unproblematic? Well unfortunately, here we enter a completely different world of pain, that of pixel based web blueprint. But at least yous don't have to worry about ppi ;). If, for instance you had a WordPress or HTML template that you know is 1100 pixels in width and y'all wanted an image to make full the content expanse, then effectually 1100 pixels in width would exist a expert size. With resizing images for the web, the number of pixels is the merely relevant item. Forget the ppi of the image, and call up information technology's website theme, the resolution of the screen and the number of pixels in the epitome that will decide the size of the presented image on screen (disregarding CSS and Retina and some JavaScript at this indicate). You lot could fence that it makes sense to set the ppi to 72 anyway. Off-white enough, I suppose. It would give consistency. I only runway against the mistaken belief that it is important to practise so. If you use Save for Spider web in Photoshop, you might find it doing it for y'all anyway. A quirk of the software is that if you lot salve the prototype with metadata, it won't change the ppi (as that'due south in the metadata), but if yous strip the metadata out when saving (by choosing None), and so open the image in Span or Photoshop again, you will meet that it's now set to 72 ppi. I believe this is considering the field tin't be empty, and and then Save for Web only puts in the default value (which Adobe has set at 72 ppi). I use Photoshop to resize my images, just you can use most whatever decent image editor. You tin even practise information technology online with services similar http://www.shrinkpictures.com/ and http://www.picresize.com and many others.
Image Resizing and Screen Resolution
Permit'due south come up back to screen resolution, as it majorly affects how big or small we resize our images. 1 of the biggest difficulties for web designers over the concluding decade or so was always what size images should be. Web design is a mixture of rendered, flexible elements like text and fixed, pixel based elements like images. Screen resolutions come in all sorts of sizes, but to blueprint a web site with pixel based elements, you accept to determine how wide your content expanse is going to be. In that location'south no indicate putting a 2000 px broad image in a webpage if xc% of the population are using screens with a maximum 1024px resolution. The prototype is simply going to exist too big to be seen on the screen. So determining your audience and designing to them was e'er a big part of the procedure. Information technology has been irresolute a lot though in the last decade. You can ascertain image size with CSS or HTML (i..e upload an prototype that'south 800px wide and tell the browser to display information technology at 400px broad), and in that location are also java scripts that can automatically resize an image to fit different screen resolutions and new vector based formats like svg are coming through. But designing for the almost common resolution of the twenty-four hour period is nevertheless a major consideration. The most common resolution today is 1366 x 768 (http://www.w3schools.com/browsers/browsers_display.asp) but with the explosion of different form factors, even that item resolution has only 34% share. Apparently with responsive templates and the like, a lot of changes are going on in the web blueprint space when information technology comes to images and how to deal with them. But the well-nigh basic part of getting started in this expanse is understanding that unless you accept a engineering at play that will repurpose images on the fly, you are best off resizing your images to fit your template and your audition. If yous wait at the current WordPress templates for example, near take a content container width of around 1100 – 12000px. This is to ensure that the content container will never exceed the resolution of the screen. As less than .v% of all desktop users take resolutions less than 1024px, this is a safe bet. In the next year or 2, my estimate is we'll see a jump to 1300px or and so, as 1024px resolutions now incorporate only 2% of users, while Retina style resolutions are increasing chop-chop. For years I had a photoblog, and I uploaded photos several times a week. It was my practice to upload images at 800px width if they were landscape oriented, and 650px if they were portrait. At the time, that meant that the images would largely fill the screen of up to 95% of my audition. These days, an 800 px image on 27″ iMac looks rather small. Merely it would still look pretty skillful on virtually laptops and tablets. Retina displays accept made things fifty-fifty more than complex.
CSS and JavaScript
Some other complexity I am going to very rapidly impact, is CSS and Javascript. With CSS yous can tell an image to fit a certain pct of the container, and with some javascript (Lightbox and the similar) has the ability to dynamically increase or decrease the size of the paradigm depending on the resolution of the screen. I don't know a whole lot about this side of things, non being too much of a coder, but I can see a time when we only upload a big prototype and the code helps united states of america display it in all all sorts of sizes, We're pretty much there already, but not quite. Yous can also utilize HTML as I've said earlier to brandish an epitome at a size other than it's original size. Trouble with this, is y'all often get artifacts (jagged lines) and lose quality in the image. You lot are likewise downloading a bigger file, only to present it at a smaller size. Responsive templates manifestly do this sort of matter today, as images get squished down to fit on a tablet or mobile phone. All this sort of dynamic resizing is way beyond the telescopic of this article, and whatsoever knowledge I take, so I invite someone who knows about that side of images for the web to footstep up and brainwash us all with a similar article.
The 'Consign As' Dialog
Compressing & Resizing images for the spider web
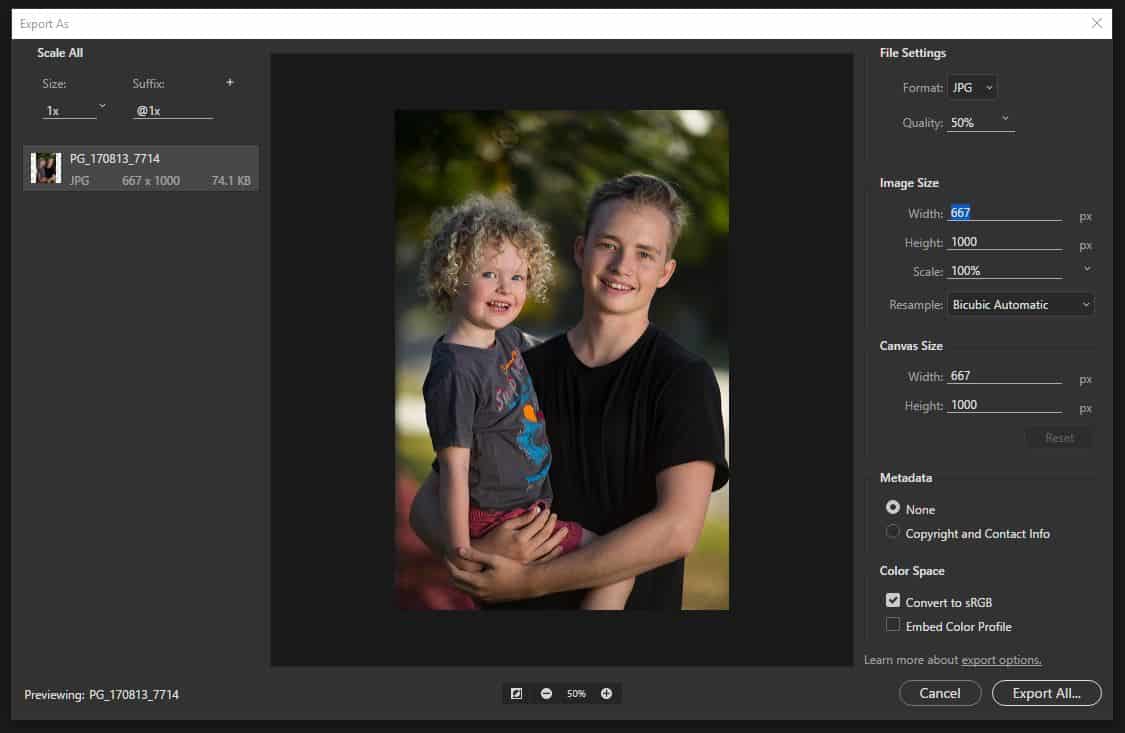
The recently renamed 'Export Equally' dialog (previously known equally Save for Spider web) in Photoshop is a tool for compressing and resizing images for the web. It outputs to one of four file formats, gif, png and jpg, plus, most recently, svg. Allow's offset with the most ordinarily used format, jpg. This is the best format for continuous tone images for the web. They can be heavily compressed, while even so retaining a lot of their detail. As noted earlier, there are two chief things that determine file size – the number of pixels in the image and the compression practical when saving equally a jpg. 'Export Equally' is designed to exist used on images that are already resized, every bit information technology is primarily a compression tool, but even if you load a full size image into it, it volition load anyway later warning you lot it wasn't designed to do so. Yous can then resize the paradigm equally well, just I prefer to resize the prototype first using the prototype size dialog and and so compress for web using 'Consign As'.
The basic compression choice comes in the grade a slider that you gear up anywhere from 0 to 100. In the case to a higher place, it took a 410.7kb image and reduced information technology to simply 74.1kb at 50% quality. How much you lot compress is up to you, but I find the best residuum for size and quality to exist around the l marking. The pinch volition also depend on the amount of detail in the paradigm (the more detail, the less redundancy is possible). Gif used to be the traditional format for graphics, like logos and such, every bit they support transparency and a smaller colour palette, but these days png is the default format for those type of files. Png files support transparency, which is very useful in web design, but pngs are a bit large, fifty-fifty out of the 'Export As' dialog. That said, there are ways to further reduce the size of pngs, including a keen niggling online tool https://tinypng.com/ which compresses the png file while retaining transparancy. Equally a basic rule of thumb, employ jpgs for photographs on the web and png for graphics. For a much more than in-depth look at these formats, check out this fantabulous article on sixrevisions.com
Colour Profiles
This is another huge surface area, and i that my interests have never taken me to. I'one thousand very interested in digital asset management, but color direction: yawn…. I'll do my best to not make a fool of myself. In fact, to be condom, I will merely say that when saving images for the web, it is all-time to ensure they are saved with an sRGB colour profile, every bit this matches virtually closely the gamut of a monitor. Adobe RGB has a larger gamut, merely images in this colour profile can look very flat and washed out on the web. Most cameras shooting jpgs are set to shoot in sRGB anyway, but if you are shooting RAW, you lot have to set the contour yourself when the information becomes an image. If you utilize Save for Web, yous can get it to convert to sRGB when saving, which is probably the easiest way to go about it. It can too embed the colour profile as well, for those few browsers that actually cheque to meet if an image has one.
Cropping & Aspect Ratios
This is a topic close to my heart. (OK, OK, I'm a nerd. Go over it). As I mentioned before, attribute ratio is inherent in the captured prototype, as it comes from the capture device. If you want a square epitome, you either have to shoot it with a 1:one aspect ratio (Hasselblad anyone?) or you need to crop, which is totally dissimilar from resizing. Cropping is both resizing and changing the attribute ratio. Cropping is something to keep in listen when shooting. You might know you want a 1:ane shot, and and then you lot compose a certain way in camera as if you were shooting with a 1:1 ratio. Or you can creatively crop afterwards yous have taken the prototype, finding new images in the image by selective cropping (equally long as you have plenty of pixels to start with you lot won't lose also much quality unless you ingather away most of the image, and particularly not if yous're just going to web). Over the course of centuries, nosotros have become used to sure attribute ratios in our two dimensional visual art. Many have their foundation in mathematics, or in that strange place where aesthetics and mathematics encounter. The Golden Ratio is a skillful instance of this (this is the "perfect" ratio). The beauty and simplicity of the square is of course another. Digital SLRs create images in a 3:two ratio (shut to the Golden Ratio just non exactly). TVs and computer monitors were commonly in the iv:3 ratio, every bit are most compact cameras and xvi:9 is at present a common wide screen ratio. The point of all this is that attribute ratios matter. When you crop, stick to an established aspect ratio than to just ingather willy nilly. This is where some web designers, particularly WordPress template designers, could do a lot more work. Images in WordPress is some other complex topic, every bit there are and so many other things at play when dealing with templates and columns and forced resizing and WordPress prototype resizing etc, but personally I think it'southward best to stick to a agglomeration of established attribute ratios so that if yous accept to crop an image to re-purpose information technology, you lot always do it in a consistent mode.
Determination
OK, that's it. I promise you have learned a few things along the way. Thank you for reading. If you dispute anything, please bring information technology up in the comments. As long equally you are reasonably polite, I will respond, and we might all acquire something.
Share This Story, Choose Your Platform!
47 Comments
Get out A Comment

Source: https://www.photografica.com.au/image-size-resolution-and-resizing-images-for-the-web/
Posted by: rexfordaniguld.blogspot.com
Hullo Colin. Cheers, and sorry your post saturday in the queue for over a month. I'yard as well decorated…
To attempt to answer your questions:
1) Yeah, and yes. There'south not much signal uploading a bigger image, simply to have the HTML code tell information technology to display at a smaller size. It's still loading the big image and then just scaling information technology down. It'south still loading the full number of bytes.
ii) Sorry, I'chiliad not sure I follow this question. You lot're welcome to elaborate.
Brilliant commodity.
Two questions 1) If my HTML epitome didactics states image size to be 600x400Px and I pull in the required paradigm and its really 1200×800 information technology volition be displayed only as a 600×400 is that right? If so, should i ideally reduce it downwardly to that size as well to reduce size further.
2) If I accept a photograph with a pic size 3000X2000 and repeat information technology for say 1500X1000 and for a given printed say photo/print size the onetime will have twice the PPI/DPI resolution (Yes?) but on a reckoner screen ( if large plenty) the old volition just look twice as big when viewed 100%, also if the screen was normal would they just spill over to different degrees i guess yep again.
A simple typo my friend. Information technology should have said meridian where information technology said width. I take corrected it now. As for length versus width, Adobe use the term width, when you sound similar you'd similar them to use length.
I am now even more dislocated than I thought were possible.
In the section "How Pixels and PPI hang together" you use the term "height" so in that same sentence use the term "width" to call attending to the very aforementioned affair. This is what is printed:
"If, for example, we type 12 inches into the height field, the resultant dialog would look like this. Notation how changing the width to 12 from 19.2 has 2 effects. One is that the width now becomes viii."
Huh??
A photo print is 2D. Non 3D. And in second, it'due south but a matter of length (the horizontal centrality) and height (the vertical axis). There isn't a width applicative in anything 2D. Width is a factor merely in something 3D such as a cube.
I only desire to know which set of digits refers to what aspect of the dimension of a print. In other words, if the dialog box has a photo listed as being 1024 × 768. (1) Is the 1024 the length, width, or meridian? And (ii) what is 768 — length, width, or height?
Some WordPress plugins do a great job of resizing and optimising images, but nada beats resizing and optimising beforehand so you take full control over exactly how the image should be used / announced as well as image size and EXIF data.
Hi Geoff,
Give thanks you for the excellent article. I'm working with a designer who has told me that some photos I would similar to be used in a video must be cropped because they don't fit a particular aspect ratio. Is information technology possible to add a border to the images to make the images (JPEGs) bigger so have whatever program she is using ingather the border out or crop less of the photos?
Thank you,
Anne
I learned lot from your briliant article. Pixel, PPI and DPI were very confusing to me before read your commodity. Information technology is very educational. Cheers for sharing your noesis..
Hello Dario,
Distressing for the delay. I missed your comment somehow.
What I would say is to cull a size that's large enough. On pretty much any screen, an image that is 1500px on the longest length for example, is quite large. Fifty-fifty on a 4K monitor, it volition fill almost half the screen. On a 1920 ten 1080px monitor it will be most of the screen. On an ipad or phone it volition exist downsized to fit, so will be plenty large enough. That'southward the way I'd arroyo information technology.
Thank you for the overnice comment! Information technology'due south a labour of honey, this ane..
Hi Grant, I might non have been as articulate as I should accept. The ppi setting in the file is a print instruction. A web browser doesn't even read it. So the issue a monitor has is that the image has so many pixels (let's say 100 x 100) and they will be distributed on the screen according to what the resolution of the screen is. So a 100 x 100 pixel image volition exist much larger on an quondam pre 1080p monitor than they volition on a 4K monitor say. The monitor definitely has an touch, it'due south simply not coming from the ppi.
Y'all say that "the ppi of an image makes no departure to the file size and neither does information technology make any difference to the visual appearance of an prototype on a monitor"
This is what'southward disruptive to me, considering if many Hard disk drive monitors/screens take a display of over 200ppi, won't an image exported at 72 not be every bit clear? If I export an image to say a carousel on Shopify or Squarespace with a specific pixel dimension at 72ppi, information technology looks a lot different between screens which have unlike densities and are different sizes. Is there any way to account for that in this type of scenario? Any farther thoughts are most appreciated!
Excellent commodity. Cheers very much for your work in putting it together. I demand to reread it several times. I am starting in existent estate photography. Customers are realtors who want to display some of my images to complement their property listings. These images are typically viewed on the screen. They are not meant to be printed, other than at very small sizes on a typical one-folio property listing. I have DNG images of about 16 megapixels at full size, exported after some cropping and bones processing from LR CC. I am making a number of these available for digital download and would like to know what a good size for the longest side might be, equally this is the i parameter I can specify (I remember my images on Google+ get put into 2048px width, if I recall.) My galleries are hosted and the provider can resize uploaded images at my request, or permit the buyer download them at the original total size. They look expert in the galleries, and I would not like them to lose item when downsized. I don't know what size monitors realtors may accept, but I imagine they are in a variety of sizes and screen quality, similar everybody else. The images tin can also be downloaded into a 'mobile app' and viewed on a phone or tablet for advertizement purposes. Do you have any suggestions or know of others in like situations and what is typical? I feel I am asking how long is a piece of string. Apologies for the trouble. Thank you in advance.
[…] dpi and ppi are irrelevant, merely pixel dimensions matter on your website Foregroundweb.com Resizing images for web photografica *THIS 1 IS Actually Proficient Check out this Amazing video serial by […]
Information technology is indeed relevant to your workflow Cal. Instead of using Save for Web, in upwardly to date versions of Photoshop, this is called Export as.. and equally I write in the article, ppi is non relevant to web usage.
Hullo Candace. If you're non in control of the website, at that place'southward not much you can do near the way they do things. It sounds rather strange to employ ACF for images, but there you become. The all-time advice I could give is to supply them in a size that'southward always going to be big enough for web and no bigger. The remainder is up to them and out of your control. A good size for a portrait image is 1000px superlative. I tin't epitome they would never demand it bigger than that. They tin reduce information technology from at that place.
Good info, very informative, merely non relevant to my workflow. When I design for print I use InDesign and consign as a PDF/Ten-1a:2001 (CreateSpace specs) and when I pattern for spider web I use "Salve for spider web" in Photoshop, and am not actually concerned with DPI or PPI, so… much simpler.
My dilema is that I photographed attorneys for their corporate website. The instructions from the law office and marketing department (not the web designer) — were that the outdoor portraits were to be horizontal. As a graphic designer, I then asked, what will be the pixel dimensions width and height (in pixels) that these images will be placed within the website. The response was 600×400.
After editing, In photoshop, and saving for web (legacy) ,Jpg, Maximum quality 100, optimized, sRGB,
Prototype size: w 600 h 402, bicubic, I transport them to the marketing department with a folder called optimized for web 600×400. The original photos I took are 28.7M (3872 ten 2592) PPI 300. Later I am asked to send the loftier resolution images.
Back to dilema: At present, when I await at their corporate website of the photos I took that were loftier quality, look very low quality. After further investigation and inspecting code, I see that it is a WordPress Site, within the code the images are named ..highres#ACF cropped. Now I know that ACF (Advanced Custom Fields) is a plugin used to manage the paradigm size. I've read all your prototype size information, besides as learning more nigh pixel aspect ratio..I think 600×400 would be a three:2 ratio but when I "salvage as" one of the images on the actual website and await at its information, I see that the thumbnails are 340×190 and if I click on the thumbnails, a fuller image pops up. The WordPress arc cropped plugin has made those 450×250. I realize you have been on all sides , photographer, designer, under web and may have already written about this. In conclusion, On my end as the editing photographer, how should I resize and deliver to this spider web designer the correct size (already saved for web) and that works with his WP plugin and then that the photos are as sharp equally I originally took them and sent them? I would non worry about information technology and could just edit them and ship them every bit the original loftier resolution but later on and so much fourth dimension and try on my role and the attorneys, I'd really like for them to look high quality on their website. Information technology wasn't just my photos that wait unsharp and grainy, merely also other attorneys photos that were taken by photographers in other cities. This could be something really elementary that I just haven't been able to piece together. I probably volition endeavor to track down the company that created their website and ask if they want me to resize to the specific epitome field they have created. I feel like it has something to do with compression and attribute ratio simply I wanted to post this and get your thoughts and so that maybe someone else could learn from my mistakes.
Hi Lindsay,
You are getting a few things mixed upwards. let me explain.
>>The images are shot at 5184 x 3456. When opening the Resize Image tab, the resolution is already set at 72ppi … which seems odd to me because I haven't done whatever resizing. Shouldn't the resolution exist more that on an original paradigm?
The SIZE of the image is 5184 x 3456px. The resolution, equally information technology shows in an image editing program, is completely changeable without affecting the pixels) as long equally Resample is unchecked. If you are non printing the images, you tin can completely ignore the ppi. Information technology is a printing pedagogy and makes no divergence for images on the web.
>>I know that the common size is 72ppi although, later reading your commodity, I am not too sure how to resize the images. Should I look into the sizes that Wix uses and then match them; go for the full general 72ppi; or make is a petty bigger to compensate for retina screen displays that may need more than 72ppi images? Give thanks you!
Retina sizes depend on the CMS, and I'yard not sure about Wix at all, only as I said, ignore the ppi and concentrate on the px dimension. For a full screen paradigm on a website you want an prototype approximately 2000px in width. For about images on a website though, they won't need to exist that big. Information technology all depends on where you are going to use them. I'd recommend downloading my ebook "How to set up images for utilise on the web' available for download at the meridian left of this folio. Good luck.
Thanks for this article – the subject is confusing merely you explained it very well. Although I am still lost when considering how to resize images for the web. I have never done so before and I am very confused virtually it. I have a Canon 600D (18 mp). The images are shot at 5184 x 3456. When opening the Resize Paradigm tab, the resolution is already set at 72ppi … which seems odd to me because I haven't done whatever resizing. Shouldn't the resolution exist more than than that on an original prototype?
I am working on some JPEG images that volition be used on a Wix website. I know that the common size is 72ppi although, after reading your article, I am not besides sure how to resize the images. Should I look into the sizes that Wix uses and and so match them; go for the general 72ppi; or make is a lilliputian bigger to compensate for retina screen displays that may need more than 72ppi images? Thank you!
I'll try and answer your question Mary.
>>Since the dpi affects print capability, if I want my images to be horrible at say 8×x prints,I should use dpi 72? Recently accept constitute out that people are uploading my 300 dpi images to a Walgreen's app and press them off themselves. I charge for prints and would like to prevent this in the futurity.
No. It all comes back to the pixel size, not ppi.
If you want your prints to expect horrible at eight ten 10″. make sure in that location isn't enough pixels to impress it that big. For expert resolution (300ppi), for an viii ten 10″ print you lot would demand 2400 ten 3000px (2400 / 300 = 8, 3000 / 300 = 10).
Then, if instead you lot fabricated sure your images were simply 800px x 1,000px, and then they could still exist printed at eight x 10″, but the resolution would now be just 100ppi, which would await pretty lousy (but probably not quite horrible)
And so, it's tricky. No matter what the physical size of the image, y'all CAN go a adept quality print from it, it would just exist smaller. And then if I took your 800x 1000px epitome, I could impress information technology at 300ppi, and I'd get a really expert looking print, but it would merely exist a bit bigger than 3″ on the longest length (g / 300 = 3.33333)
You might be better to look at using a watermark on your images, every bit they are not as easily removed.
Does that help? I know it seems complicated, but one time you get the basic principle, it all makes sense,
I take a question, since the dpi affects impress capability, if I want my images to be horrible at say viii×10 prints,I should apply dpi 72? Recently have plant out that people are uploading my 300 dpi images to a Walgreen'due south app and printing them off themselves. I charge for prints and would like to foreclose this in the future.
Wowowowowowowowo give thanks you soooooo much for this astonishing and much needed commodity!! You're truly gifted and answered every single question I had….then well explained.
PS: I think I have noticed the aforementioned problem in the past with the topic the person to a higher place me mentioned. Is this true? Can you explicate this to us? Accept a blessed day 🙂
I appreciated the clarity and depth of this commodity. And the links to useful resources. Thank you!
Wow! Who knew a google search about resizing images for the web would lead me halfway around the earth? Simply yous answered my question and saved me from additional hurting trying to become giant architectural photos properly resized for previously confounding Squarespace parameters. Equally a professional person services marketer in a small part, I wear a few-too-many hats and some, similar graphics and spider web maintenance, are very ill-fitting, Thank yous for spelling it out evidently and clarifying that my photos won't render every bit pixely blurs.
PhotoViewerPro is non in the list , it's a handy tool and I've been using it for quite sometime now.
Nice article – I am just getting started and much of my previous piece of work was all done at xvi:ix aspect ratio (72 dpi), some of it is at 5312 x 2988, other work is at 3264 ten 1836. I am trying to find out what the all-time optimum way is to crop photos for standard size printing, ie. eight×10, 11×xiv, sixteen×20, etc. Also, based on the aforementioned figures, what is the largest size prints I can have made (while all the same keeping the image quality decent).
Is this something I should crop on an image past image ground, or as long every bit the majority of the subjects are centered, is there a free cropping / conversion tool that would batch handle photos? Later on – if it's what I need to do, I can shoot raw and import photos, but years of pictures I have taken has typically been at sixteen×9 aspect ratio. Now that I am getting into printing – is in that location a commerical clearinghouse that handles printing / drop shipping, possible with online tools available to already handle this, or am I simply going to take to practice it all by hand?
Any recommendations would be greatly appreciated.
Thanks!
Robert
ok, here comes the stupid question….my publisher for a new book wants 300DPI images. I have shot them in raw format that downloaded to the computer for minor touch ups every bit 6000×8000 images, but at 96DPI. From all I have read the images appear to be nifty for printing a 8×10 volume but the DPI number is killing me!
give thanks yous and yes, you all can laugh all you want, I merely need to know they will be fine.
Have a look on my homepage for a link to my new ebook on the subject.
Thank you for your research and communication!
At present to endeavour to put this into action.
[…] color profiles of the images that yous post accept the tendency to be of a unlike setting than the one they are going to be […]
[…] Image size, resolution and resizing images for the web … – In this article, we will look at digital imaging concepts to do with resolution, prototype size and resizing images for the web and bust the 72ppi myth forever. […]
Torri, they just need to be the aforementioned pixel dimensions. So if ane is 300 10 300px, all the others need to be cropped to that aspect ratio and size.
I am virtually to evidence how trivial I know just that is why I am here. I desire to exercise ane thing and one thing only. I can't figure out how no affair how much I read. I want to have profile pictures of lath members on a website. They need to exist "physically" the same size. In other words they demand to line upward neatly in a row. I can't brand it happen.
Bobbo, I would resize to around 2000px wide and shrink to 50-40% to achieve a good file size.
Hey nice article this is kind of what I was looking into. So Im designing my website and ran into the image dilemma. How to get the smallest file size but the best quality, and how to be able to have my images accessible from all devices and fill up the width of any screens. My lumix zs-forty photographic camera takes JPGs around 5-vii MB in size, 4896 10 3672. What I did was apply a control in mac that runs through photos in a folder and reduces the pixel dimensions while retaining aspect ratio ( sips -Z 1632 *.JPG ) shrinking the pixel dimensions past 3x (1632px wide) which gives me an ok size, 300-1000KB. But its still as well big I think for a website. Also for people with widescreen xvi:nine 1080p monitors I want my images to fill up their screen likewise and expect good, so 1536 or 1632 wide is a petty short of this goal. What do you think about this: Shrink my pixel dimensions to around 1920 -2000 px broad, and then compress the jpg to a reasonable size (yous mention 50% preset) . This would allow my photos to make full widescreens and hopefully take a smaller size but decent quality. I will do some experimenting.
Hullo Cheryl.
It's non the resolution you need to increase it's the pixel dimensions of the images, and the all-time way to do that is become back to the source file. They would have been bigger than 840 / 900px when originally taken. If that'south not possible, you tin interpolate the images but only and then far. Don't know about gratuitous programs, deplorable. I apply Photoshop. Endeavour google for "gratuitous interpolation software" or something like that. Good luck.
Hi, I am working on creating a photo blanket, 50X60″ and I have called vi photos. Some of my photos have low resolution something similar 840X480 or in the 900'sX600's. When I chose the photos that had those resolutions the online site stated that the photos had a depression resolution. How can I increment the resolution on photos when they are in png and jpeg file format? Is it possible to practise and then and if so, is there a free download that offers that? I have Windows 10. Whatever assistance/suggestions would exist greatly appreciated. Thanks.
Cheryl Nevin, Waterloo, Ontario
Nathan, my comment was almost changing ppi without resampling at the same time. Changing ppi on information technology's own does not affect file size at all.
With regards to your claim of "It reduces the file size – Rubbish", I'll admit I'k a tad perplexed. And my confusion comes from using ImageMagick under PHP. Using a sample JPEG (a rather large photo of a galaxy), using purely JPEG compression to 60, I become the file to reduce from 35.8MB downwardly to 7.7MB – all the same, if I resample the image to force it to 72×72 then the resulting file is 3.4MB which seems adequately meaning to me. Do y'all think the actual process of resampling is creating a situation where the pinch purely works improve (in which case it'due south still better to resample since it triggers this additional compression)?
Fantastic piece of work! Thanks for the info!
Much appreciated. Very helpful. Many thank you.
Alan2102 – have you lot found a solution to the problem you lot describe above? I discover the same thing and do not know how to fix it. Thanks.
Wow you put a lot of inquiry, idea, and fourth dimension into this and I capeesh information technology. I stumbled onto it doing a search for "why do I accept a thin line effectually my image on high resolution screens" and though I didn't get that answered, not exactly, I accept a better idea and however thoroughly enjoyed geeking out on this article. Haha. Thanks for writing it!
Alan, this shows how complex resolution is. Resolution is also affected by size and viewing distance. Have the lcd on your digital slr. The images appear sharp on there, and when you go them habitation, sometimes they are not and so sharp, right? That's an example of the same number of pixels non beingness viewed at 100% simply perhaps simply at 10% or twenty%.So therefore it looks sharper, but equally if you enlarge an image too much you lot will start to come across degradation.
In Photoshop, if I reduce the size of an image (say from 5000px in width to 300px in width) and withal view that paradigm at 100%, I do non encounter ANY loss in visible resolution. Of course if I view it larger than 100% it is jagged and pixelated. You lot can't throw away 80% of the pixels and still expect quality at the same size. Simply if you don't view it larger than 100% there is no degradation in the visible resolution.
If you can show me some examples of what you mean, I might exist able to meliorate reply you.
Thank you for commenting.
Sam, I am no expert on InDesign, but I do use it to design printed matter. I but exported on of my layout at 300ppi and it didn't change the document size at all. Merely I can run across that when you create a new document, you cull an intent – impress or web. My estimate is this sets the resolution (ppi) at the time of making the certificate, and if you so alter it, it volition change the document size every bit information technology's not interpolating. You'd have to do some more inquiry, merely perhaps there's no way to decouple the ppi and the pixels within InDesign like at that place is in Photoshop. Hope that helps.
Great mail service, actually interesting array of data.
However I'g trying to understand the 'resolution does not affect image size' function. This may be the instance in PS and perchance AI (non tried it). But occasionally I have to create an paradigm/icon/push button for web using Indesign. I set the document upwards equally a document for web and put in my certificate size (110x46px) for case… When I consign that as a PNG to exist used on the spider web it gives me a small bill of fare where I tin can input resolution (this by default is set equally 72ppi). Upon reading this post I decided to try outputting my images equally 96ppi every bit information technology should not touch file size and there is no harm in having an image with higher resolution. My issue was a PNG file that no longer measured every bit 110x46px, it had in fact increased the paradigm size due to me changing the resolution? I tried again at 72ppi and low and behold it came out the right dimensions.
Whats going on here?!
Squeamish writeup. Only it does not address what I've found to exist a very vexing problem, apparently without any solution (that I can observe, subsequently quite some hours of searching). That is, loss of resolution when reducing image size. This happens INVARIABLY, with numerous software items (paint, paint.internet, irfanview, inkscape, etc.) and online services (picresize.com and the like). I've tried all kinds of tricks, converting to pdf and trying to re-scale, and more. Zilch works. This is so funny, considering in the olden days information technology used to be that reducing the size of an image invariably increased the resolution; even fuzzy images became razor-sharp if you reduced them plenty. Back in the 1970s, I worked briefly on a Kenro vertical photographic camera, doing resizings, and saw this up close. Somehow, I cannot wrap my head around this new reality — i.eastward. of the opposite. Reduce image size and… LOSE resolution?! It seems incomprehensible to me. But that is the way information technology is, and there seems no way of avoiding it. Only then, there MUST be some manner of fugitive it! I hateful, are ALL photo professionals satisfied with this state of affairs? Of not being able to create, say, a agglomeration of thumbnail images (from larger originals that of high resolution) without serious deterioration of prototype quality? It seems bizarre to me that I cannot detect a shred of information near this, much less a reliable solution. Information technology is as though no ane else really notices it. Crazy.